Paper Sculptures

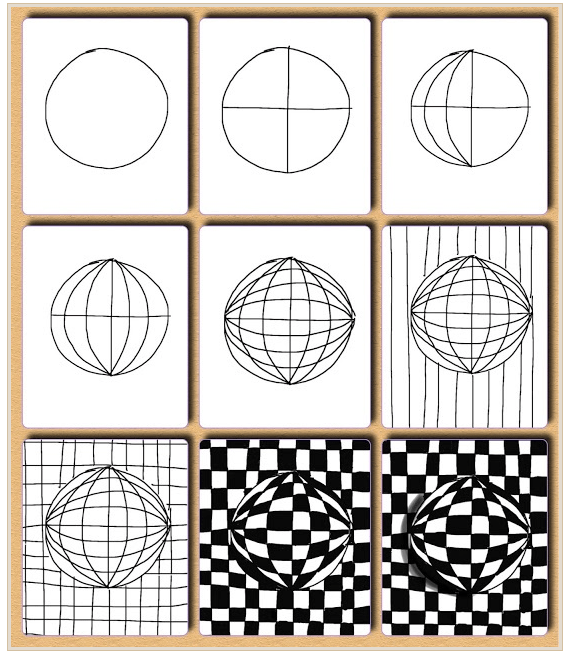
Today you are going to learn about making 3D sculptures out of 2D flat paper/card.

Sculpture is 3 Dimensional art – it has height, length, depth. It takes up space and is not flat. You can see almost all sides of a sculpture, you can walk around and even sometimes under or through it and sometimes you can make it move.

Materials:

*coloured card or paper

*scissors

*glue

*Black or white card for the base

Watch the attached video to learn how to make the paper sculpture.

https://www.youtube.com/watch?v=kpqjB_ocFlE&t=29s

Have fun creating your sculptures 🙂

Kinetic sculpture – David C Roy

Amazing kinetic sculptures by David C Roy will mesmerise you with his unbelievable wooden sculptures.

Prior – Questions:
Is this art a sculpture?

What is Kinetics?

Why are his sculptures different from other sculptures?

Discuss your thoughts with someone next to you.

Now watch the first video on how he makes his works of art.

Once you have watched the video rethink your answers to the above questions. Enjoy watching the other 3 sculptures he has made.

Optical Illusion Art

Optical Art was made famous by Mc Escher. He had an amazing ability to create drawings and pictures using mathematics, lines and imagination to create his works of art.

  ‘Waterfall’ c1961

‘Relativity’ c1953

‘Sky and Water 1’ c1938

Optical Drawing activities: Enlarge each image to see instructions/steps.

Have fun creating your own optical illusions 🙂


Abstract Circles

Materials: A4 white paper, lead pencil, marker (for tracing over), circular object to trace around (glass/cup), colouring in items (pencils, textas, paints, crayons – your choice)

Step 1. Trace around your circular object. Fill the page with circles (have some go off the page). You can use a lead pencil first if you want or you can use the markers/sharpie straight away.

Step 2. Use different colours to colour in every section. Try not to have the same colour next to each other.

Step 3. Take a photo of your artwork and upload it on to Seesaw under the Visual Arts folder.

Have fun and I look forward to seeing your finished artwork 🙂

Up Close Drawing

Materials: A4 white paper, pencil, ruler, eraser, a found object

Step 1. Rule up your page into 6 boxes (see example)

Step 2. Place your object in front of you and pay attention to all the details you can see (from one view) Draw it carefully.

Step 3. Now place your object in 5 other positions and draw them. Remember to pay attention to detail and make them up close.

Step 4. You can colour in your drawings if you like otherwise take a photo and upload it on to Seesaw under the Visual Arts folder.

Have fun looking closely at the details of your object in different angles and positions 🙂

Collage & Zentangle Faces (week2)

Activity: create your own Collage & Zentangle picture.

Elements of Art: line, shape

Principles of Art: emphasis, rhythm, contrast

Materials: magazine or a enlarged colour photo of yourself, glue stick, black thin sharpie or marker, A4 white paper

Step 1. Cut out a large face (only the face) or print out a large coloured picture of your face (maybe school photo)

Step 2. Glue face onto blank white A4 paper near middle of page (think of the placement of your face)

Step 3. Draw up some larger lines to break up the background into sections (look closer at the examples above if unsure)

Step 4. Fill in the sections using various lines/patterns (refer to the zentangle designs provided for ideas or create your own).

Step 5. Once you have completed your detailed face design take a photo of it on Seesaw and upload it into the Visual Arts folder.

I’m looking forward to some interesting pictures.

Have fun 🙂

Collage Faces (week 2)

Activity: Learn to create a ‘Collage’ like Rene Magritte (Surrealism Art)

Materials: listed in the slideshow

Elements of Art: line art, colours, shape

Principles of Art: unity, emphasis (refer to the ‘Principles of Art’ poster under ‘Learning Resources’)


Step 1. Read through the slide show on Rene Magritte to learn more about him and surrealism art.

Step 2. Read through this slide show about ‘How to make Collage Faces’

3. Print out PDF faces or you can draw your own on a piece of white paper.

On my head f

On my head m

4. Once you have completed your Collage Face, take a photo of it and upload it onto Seesaw under the Visual Arts folder.

I’m looking forward to seeing what you make. ENJOY!!!!


Draw ‘Pigeon’ – Books by Mo Willems (week 2)

Activity: Learn how to draw Pigeon.

Materials: white paper, lead pencil and colour (use either pencils, crayons or textas)

If you have any of the books by Mo Willems at home, read it together or you can watch the Youtube story below.

http://www.youtube.com/watch?v=Dljje7L9nIs

  1. Follow the steps to draw Pigeon

2. Colour in your Pigeon if you like.

3. Take a photo and upload it onto Seesaw and save it under the Visual Arts folder.

Have fun drawing Pigeon 🙂